City Center Receding

City Center Receding
2005-12-27 Coyote Creek_MG_6448C

This is a montage of three images. The images of the tree trunks was taken in Samuel P Taylor park but never posted. The second image is a marsh scene from Coyote Creek trail. The final image was taken with my small digicam in downtown Oakland.

On an earlier B&W post, Terri mentioned the B&W work on Andre Kertesz. This reminded me of a find at Photo San Francisco. Check out the Night Journey series of Susan Kae Grant. I visited the Modern Book booth and was fortunate to see her entire portfolio. On my B&W images, I must try a more creative approach to unblock myself. I think all the masterful B&W work that I have seen is running through my head and stopping my own experimentation.

Yosemite #21

Yosemite #21
2006-04-21 Yosemite_MG_2260 copy

This is from my ’lost Yosemite’ series. I found some photos that I never posted from my Yosemite visit. These are not favorities but worth posting. So now, I have more images until I get back out there. This was taken my first day in the park during midday full sun. I used a high-dynamic range (HDR) image with about 7 bracketed images. You can see the clouds move between shots.

On a different note, Terri has pointed out that I have no photo of myself on my site. I have be negligent and my only excuse is that I hate to have my photo taken. However, I want to apply for a passport. I am considering visiting London for the Hampton Court Palace Flower Charity Gala Preview over in England. They contacted me about using a water lily image for their promotion. Well, that got me thinking why not go visit?

Orton Technique

Orton Technique
2006-07-01 Berkeley Rose Garden_MG_4444-02

Tonite, I am deeply touched by Terri’s recent post. Terri authors Wind Lost, a blog, about her struggles with chronic tension headaches which she handles with grace and courage. Terri is also a gifted photographer. Her posting has inspired me to try out some new techniques with my black and white photography, called the Orton technique.

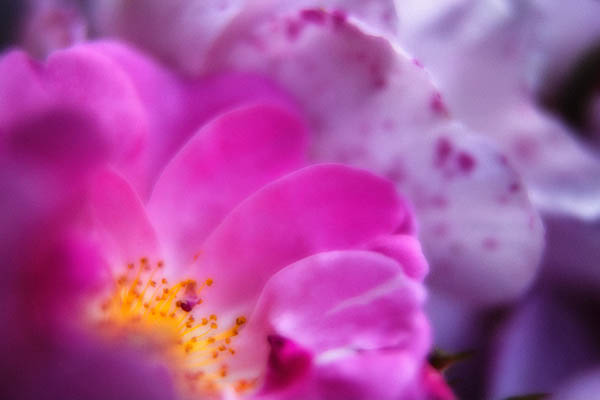
I attended a Freeman Patterson/Andre Gallant workshop recently and both use the Orton technique regularly. The basic idea is to combine two shots together of the same scene. Both are overexposed. The first shot is overexposed by 2 stops and sharp (think f/22). The second shot is out-of-focus with the lens wide open and about 1 stop overexposed. If you shoot slides, you sandwich the slides together. If you are digital, you combine the images into a single Photoshop file. Place the out-of-focus layer on top of the sharp layer and change the blending mode to Multiply. See here for a Orton Photoshop action.

You can simulate the Orton technique using a single image. Open and image. Add a Level Adjustment Layer. Move the midtone slider to something like 1.50 (this you can play with later). Copy the background layer and place it above the adjustment layer. Now, change the Blending Mode of copy to Multiply. Apply Lens Blur onto the copy of the background layer. If your version of Photoshop does not have Lens Blur, go ahead and use Gaussian Blur. The more blur means the stronger the effect. Finally, add a second Levels adjustment layer on top of your blurred layer. Adjust the level’s midpoint to something like 125. From here, you can experiment with the level adjustments, amount of blur, etc.

If you would like more inspiration, Andre Gallant has a book called Dreamscapes.

If you are considering taking a photographic workshop, I would wholeheartedly recommend the Freeman Patterson-Andre Gallant workshop. I had a fantastic time and loved Canada. I have never met nicer people. As a bonus, I met many wonderful photographers.

Accidental Self-Portrait

Accidental Self-Portrait
2006-08-20 Santana Row_4

This is another from my baby-steps into black and white film photography. I was upstairs in the Borders bookstore in Santana Row. I noticed the palm fronds outside the window and thought — hmmm maybe a good black and white photo. Instead here I am gripping the camera (in bad form because my left-hand is not cradling the lens) appearing through the blurry fronds. I was using manual focus and I am not sure what I thought was sharp. I am using my favorite 50mm f/1.4 lens which is my default lens when I need lightweight, fast, etc.

On a digital technique note, I tried simulating the creamy effects of a cold head enlarger using Noise Ninja. Actually, I have never been in a wet darkroom and did not know what that meant but I do like the effect. For all the details, check out Doug Plummer’s Dispatches.

On the humorous side, I spoke to Mother this morning. She has already called my B&W film adventure ’stupid’. For any B&W photographers reading this posting, please do not take offense, just remember that she does not really know anything about photography. Well, she saw yesterday’s post and said "I guess it is pretty enough if you could just add some color."

Berkeley Botanical Gardens

Berkeley Botanical Gardens
2006-08-20 Santana Row_3

Well, my adventures with B&W film continue.  To my surprise, the processing of my second roll of Kodak 400CN is totally different than my first roll.  The first roll was mailed to a lab and came back with WAY TOO much contrast and a strong sepia/magenta cast.  I thought well what am I going to do with my other 8 rolls of film?  So, I continued shooting my second roll of Kodak 400CN film.  This time, I was going to use the one-hour photo at Costco to process.  The technician claimed it needed B&W processing and just would not believe that it was supposed to be processed in color chemicals.  I wended my way through the crowds to leave.  I headed across the street to Ritz Camera.  The prints cost me 3x as much and came back completely different.  The prints are neutral and fairly flat.  That is great because I can add contrast to my taste after scanning.

On a different note, most of my images from my second roll are fairly boring.  I am feeling really exhausted and creatively depleted lately.  I visited Santana Row this weekend and took a roll of B&W film.  Most of the images are so what and some are what was I thinking!  I hope to go out and find my muse again soon.

Peacock Feather #3

Peacock Feathers #3
2006-08-19 Home_MG_4780-01

This maybe the last of the peacock feathers for a while. If you are wondering, I used a very simple setup for these images. I have a Sigma 50mm macro lens that can go to life-size. I placed the peacock feather wreath on my desk with a desk lamp shining down onto it. The light is from Sharper Image and is daylight balanced. I use this light to evaluate prints.

Flowering

Flowering
img001

This is my first film shot.  Right now, I am fairly frustrated with the entire process.  The worst is the scanning.  I can only get the scan to work (with anything visible) when fully automatic.  So, I guess I will have to read the manual.  This is Kodak BWCN film.  It is printed in normal color solution but comes out very warm with a little magenta cast.  I converted this to B&W in Photoshop.